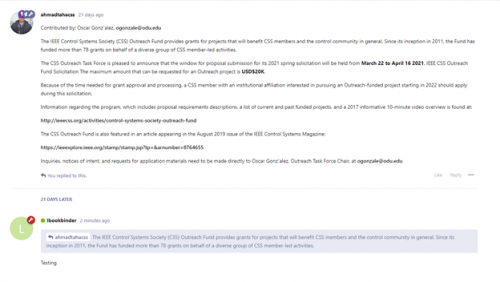
Greetings CSS friends! Confused on how to navigate the forum? Unsure of how to post?
Never fear! This handy tutorial is here to help!
Contents
I. Navigation Bar
II. Home page
III. About page
IV. Posts page
a. Left Menu
b. Tags
c. Tags View
d. Post Settings:
e. More Features
V. People Page
VI. How to post
a. How to tag your post
VII. How to continue the discussion
a. Replying by typing or hitting the reply button
b. Hitting the reply button when mousing over
c. Using a quote reply
I. Navigation Bar:
The navigation bar is found at the top of the screen. It includes, from left to right, the “CSS State-Space Forum” logo, “About”, “Posts” and its dropdown menu, “People” and its dropdown, a search bar, a flag which represents flagged posts, a notifications bell, and your profile picture with your account name.

II. Home page:
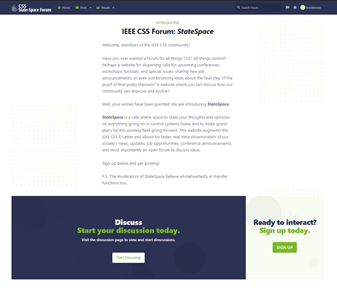
The home page introduces the IEEE CSS StateSpace forum and prompts you to “Start Discussing” which takes you to the Posts page or to “Sign Up” to create an account. This page can be navigated to at any time by clicking on the “CSS State-Space Forum” logo on the top left of the page on the navigation bar.
III. About page:
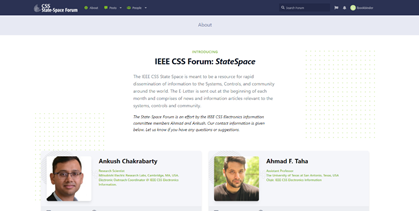
The about page introduces the forum and its committee members. You can navigate to this page at any time by clicking “About” on the navigation bar.
*IV. Posts page:
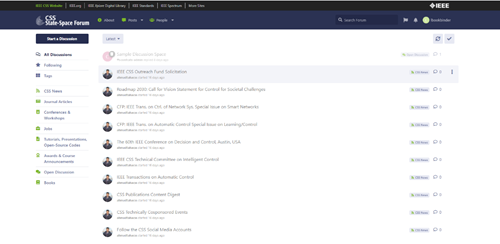
The posts page is the main focus of this site; It is the forum! The gray highlighted block is a post and there are many others underneath. You can see from the main posts page a post’s title, author (whose image appears in the circle to the left of the post block), how many days ago the post was made, its tags (in the gray block’s case, the post is tagged “CSS News”), how many replies it received (the speech bubble with numbers), and the three vertical dots on the right represent the post’s settings. You can click on any of these posts to get access to its content and discussions.
a. Left Menu:
This menu appears to the left of the posts. You can click the “Start a Discussion” button to start drafting a post. Following that button, there are three different viewing options: “All Discussions”, “Following”, and “Tags”. “All Discussions is the default view like the one shown above. “Following” shows only the posts you have followed. “Tags” shows only the different possible tags. The tags are then listed below these viewing options (i.e., “CSS News”, “Journal Articles”, etc.).

b. Tags:
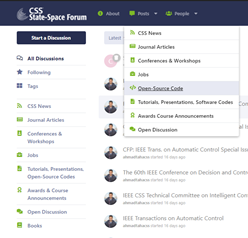
Tags are used to categorize posts and make them easier to find. You can find the tags to the left of the posts and in the dropdown arrow next to “Posts” on the navigation bar. When you click on one of them, it displays only the posts that use that tag.
c. Tags View:
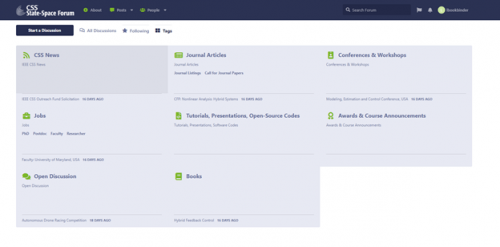
This is what “Tags” view looks like. From here, you can click on a tag and it will then display only the posts that use that tag.
d. Post Settings:
As discussed earlier, the three dots to the right of a post’s block contain the settings. Here you can click the star to “Follow” a post. The starred post will then appear in the “Following” view. If you authored the post, you can also choose to rename the post, lock it from receiving any more replies, edit the tags you used on the post, or even delete the post.


e. More Features:
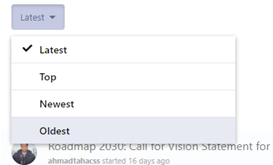
The notifications bell on the navigation bar will update with a number when someone comments on your posts. The flagged posts flag will show the posts that you have flagged. On top of the posts but below the navigation bar you can find additional options. There is a dropdown that will sort through the posts you have displayed and can show either the latest posts, the newest posts, the top-rated posts, or the newest at the top. The button with two arrows pointing to each other is the refresh button. This will refresh the forum and show posts that have just sent. The check mark button next to the refresh button is the “Mark All as Read” button. This will make all posts appear as though you have already read them. Be careful you don’t miss out on cool content, though!

V. People Page:
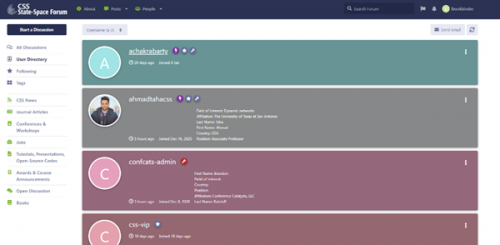
Clicking on the “People” button on the navigation bar will bring you to the People Page. Here you can see all the people that are active in the forum. You can find a sorter like the one just talked about but this time you have options to sort by Username in alphabetical or reverse alphabetical order, newest member, oldest member, most recently online, longest away, those with the most discussions and those with the least. You can also press the “Send email” button to compose a message to users of the forum. There is also a refresh button like the one mentioned before. There are sometimes symbols next to peoples’ names. These symbols indicate their status on the forum, whether that be as a mod, as a VIP, or as an admin. Mouse over one to find out what they are. You can click the three vertical dots next to someone’s block to email them directly. The clock under someone’s username tells you the last time they logged in and the “Joined” part indicates when they joined the site for the first time.
VI. How to post:
We’ve talked in detail how to navigate the forum. Now it’s finally time to write your first post! As said earlier, the “Start a Discussion” button on the Left menu is how you draft posts. When you click on it this window pops up. Here you can write your discussion post’s title, its contents, and its tags. On the top right there are three buttons, the minimizer, full screen, and exit. The minimizer allows you to minimize a post you are writing from view. You can access it again by pressing on the block. The full screen button allows you to compose your post while it takes up the entirety of your screen. The exit button closes your post, deleting it before you post it. The options on the bottom allow you to post the discussion (when you’re done with it!), attach a file to your post, add header text, add bold text, add italics, insert a quote, insert code, add a link, add an image, add a bulleted or numbered list, insert emojis, or mention a user/other post.

a. How to tag your post:
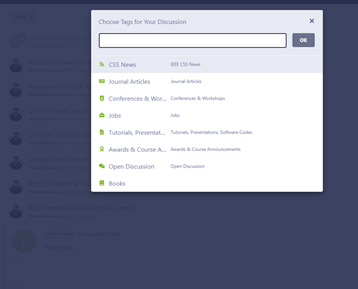
Click the “Choose Tags” button to the left of the Discussion Title to tag your post. When you do, the window shown below will appear. Here you can type in a tag that you would like to use and/or select it from the menu of tags.
VII. How to continue the discussion:
When you click on a post and you have something to add or question to ask, you can reply to it. There are many different options for how to reply. You can reply by typing below the post, by hitting the reply button on the side or on the post itself, or by using a quote reply. After you post your reply, it will appear below the original post in a linear fashion. If someone already replied to the original post beforehand, your reply will appear below theirs. You can also reply to others’ replies in the same ways listed.
a. Replying by typing or hitting the reply button:
At the bottom of a post, there will always be a reply text box where it prompts you to “Write a Reply…” At any time, you can click there and the exact same window from the “How to Post” section comes up. There will also always be a blue “Reply” button to the right of a post where the same typing window will come up. That button also comes with a dropdown menu of additional options only if you originally authored the post where you can edit it after you post.
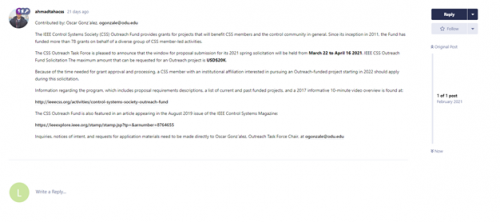
This is what a normal reply looks like when posted:
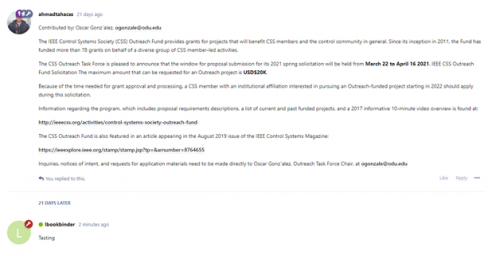
b. Hitting the reply button when mousing over:
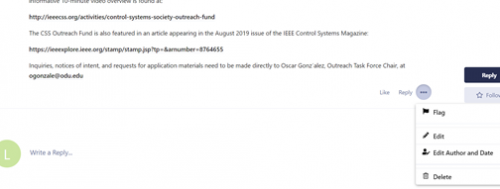
When you mouse over a post, three options show up in the bottom right of it as shown in the image below. One is “like” where if you click it, you show the author and others that you like that particular post. Another is three dots which give you a drop down of more options when clicked, like the option to flag a particular post/reply. If you are the author of that particular post, the options to edit it or delete it also appear.
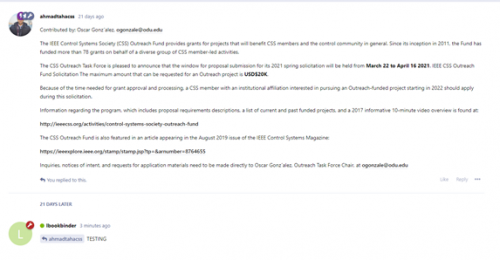
Another option in this mouse over menu is “Reply”! If you reply this way, it tags the post’s author automatically, as shown in the image below. You can then type whatever you want after the tag and hit “Post Reply”.

This is what a tagged reply looks like when posted:
c. Using a quote reply:
If you would only like to reply to a specific quote from a post, the quote reply option is your friend! Simply highlight the text you would like to reply to and a “Quote” option will appear.

After you click “Quote”, the text box comes up with that quote included in your post. You then type whatever you want and hit post.

This is what a quote reply looks like when posted:
